Preparations
Get the hardware sorted and pick your passwords before you boot anything.
Before you boot a single terminal, get the hardware sorted and pick your passwords. Five minutes of prep saves an hour of hunting for a missing cable later, and keeps you from inventing a password on the fly when you should be paying attention.
What you need
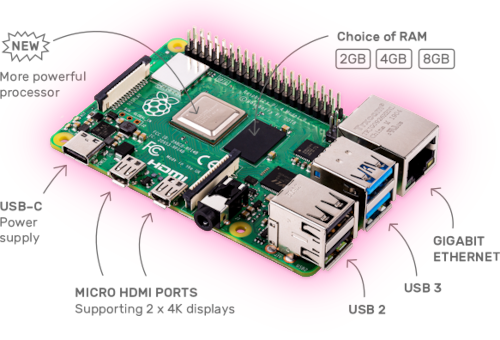
You're building on the Raspberry Pi 5, a credit-card-sized computer that draws about the power of a phone charger and still has enough muscle to run a full Bitcoin and Lightning node. It's the primary target throughout this guide. The older Pi 4 works too, and gets its own callouts wherever the story differs.
| Part | Recommendation |
|---|---|
| Computer | Raspberry Pi 5, 8 GB RAM |
| Power supply | Official 27W USB-C PD power supply |
| Storage | 2 TB USB 3 SSD in an external enclosure |
| Cooling | Active cooler (official or compatible) |
| Cable | Short USB 3 cable rated for SSDs (often included with the enclosure) |
| Case | Optional, but recommended for protection |
No microSD card? Correct, you'll boot the operating system directly from the SSD. It's faster, more reliable, and one fewer component to lose.
Why 2 TB?
The Bitcoin blockchain is a big, growing thing. As of 2026 it's around 700 GB, adding roughly 7 GB every month. On top of that, the Electrs index (which makes your wallet fast) needs another ~70 GB, and the operating system eats ~20 GB for itself and logs. A 1 TB drive is basically full on day one. Give yourself the 2 TB of breathing room.
SSD enclosures: chipset matters
Not all USB-to-SATA enclosures play well with the Pi. The ones based on JMicron chipsets (JMS578, JMS580, JMS583 and friends) are a long-running source of reset loops, dropped connections, and failed boots.
Enclosures built around the ASMedia ASM1153E chipset are the safe bet. If you're buying new, pick one that advertises it on the product page.
Feeling fancy? Go NVMe
The Pi 5 also supports NVMe SSDs through the official M.2 HAT+. NVMe builds index faster and syncs the blockchain noticeably quicker, at the cost of more hardware and a little more assembly. A good USB 3 SATA SSD is perfectly fine for everything in this guide, NVMe is a nice-to-have, not a requirement.
Using a Raspberry Pi 4?
The Pi 4 still gets you there, just slower, initial block download and Electrs indexing take noticeably longer. Use the 4 GB model or larger (8 GB preferred) and the official 15W USB-C power supply. Wherever the Pi 4 needs a different step, this guide flags it.
Other platforms
Not a Pi person? The guide sticks to standard Debian, which means it also runs happily on other Debian 13 machines, a cloud server, a VM on your laptop, an Intel NUC, or another ARM board. The shell commands are identical; only the hardware chapters differ.
Passwords
You'll need several passwords during the build. Pick them up
front and write them all down in one place, so you're not inventing
one under pressure two hours in. This is why a few quiet minutes
now beat frantic guessing later. Every password should be unique
and at least 12 characters long, and avoid exotic special
characters, spaces, or quote marks (' or "), some config files
don't like them.
| Label | Purpose |
|---|---|
[ A ] | Master user password (admin login) |
[ B ] | Bitcoin Core RPC password |
[ C ] | Lightning wallet password (LND) |
[ D ] | Block explorer password (optional) |
[ E ] | Ride The Lightning (RTL) web app password |
Store the list in an open-source password manager like KeePassXC, free, offline, no cloud involved. When the build is done, keep any paper notes out of sight.
If you need inspiration for strong but memorable passwords, the famous xkcd "Password Strength" comic is funnier than this guide and still correct.
Secure your home network
Your node is only as private as the network you reach it from. It's worth spending a few minutes on home hygiene before you start:
- Change the default admin password on your router (most brand-new
routers still ship with
admin/admin, truly). - Install the latest firmware update for the router.
- Disable WPS and UPnP if the router lets you.
- Use WPA2 or WPA3 for Wi-Fi, with a strong password.
- Keep your phone and laptop patched and protected with a screen lock.
For a full walk-through, read How to Secure Your Home Network Against Threats and apply as many points as your router supports.