Desktop wallet
Point Sparrow Wallet at your own Electrs over TLS. Watch-only wallets, hardware wallet integration, coin control, labelling UTXOs, air-gapped PSBT signing.
A node with no wallet is a useful thing, but it's not a personal thing. This page closes the loop: a wallet on your computer, talking to your node on the Pi, signing with a hardware wallet you hold in your hand. That's the endgame, your keys, your node, your validation, your privacy.
The pick: Sparrow Wallet by Craig Raw. Active development, transparent about what it's doing under the hood, first-class support for every common hardware wallet, excellent coin control, PSBTs, and batching. Sparrow is the right default for most people using a RaspiBolt.
Not Sparrow?
If Sparrow doesn't fit your workflow, these are all fine companions to a RaspiBolt:
- BitBoxApp, the natural choice if you hold a BitBox02 hardware wallet.
- Electrum desktop, the original. Powerful, a little austere, and still the yardstick for Electrum server compatibility.
- Specter Desktop, focused on multisig and air-gapped workflows. Connects directly to Bitcoin Core rather than Electrs.
- Ledger Live or Trezor Suite, OK if you're already in those ecosystems; both can point at your Bitcoin Core RPC. Less flexible than Sparrow.
The rest of this page walks through Sparrow. The other wallets follow roughly the same pattern, pick the "Private Electrum Server" option and point it at your Pi.
Hot wallet, watch-only, and why hardware matters
A quick piece of framing before you install anything.
- A hot wallet holds its private keys in plaintext on a device connected to the internet. Fine for small amounts; dangerous for savings.
- A watch-only wallet holds only your public keys. It can show balances, build transactions, and tell a hardware wallet what to sign, but it cannot spend anything without the hardware wallet present.
- A hardware wallet keeps private keys on a small dedicated device that never exposes them to your computer. Signing happens on the device itself; your computer only sees the signed transaction.
Sparrow is happiest when it's watch-only plus a hardware wallet on a USB port. This is why, if you can swing it, you'll want a BitBox02, Coldcard, Jade, Ledger, or Trezor before you load real funds into this setup.
Install Sparrow
Sparrow ships signed releases for Windows, macOS, and Linux. Verify before you run.
-
Open sparrowwallet.com/download and grab:
- the installer for your OS,
- the
sparrow-<version>-manifest.txt, - the
sparrow-<version>-manifest.txt.ascsignature.
-
Follow Sparrow's own release verification guide. The short version: import Craig Raw's PGP key, verify the manifest signature, then verify the installer against the manifest's SHA256.
-
Install and launch Sparrow.
Verify, then install
If the signature check fails, stop. Don't install. Ask on Sparrow's Telegram before doing anything else, this is not the moment to give a random binary your seed words.
Connect Sparrow to your node
Sparrow's first-run wizard walks you straight into server
configuration. If you're past that screen, you can reach the same
dialog at any time with Preferences → Server (Ctrl-P on
Windows/Linux, Cmd-, on macOS).
- Select the Private Electrum tab.
- URL:
raspibolt.local(or your Pi's IP, e.g.192.168.0.20). - Port:
50002. - Toggle Use SSL on.
- Click Test Connection. On first connect, Sparrow shows the
self-signed certificate from stunnel, read the fingerprint, then
Accept. The button turns green and reports something like
Connected to electrs/0.11.1 on protocol version 1.4. - Close the dialog. Bottom-right of the main window, the server icon should be solid blue, "Connected to ... at height ..." on hover.
Certificate warning is expected
You saw it coming: the cert was minted by stunnel's openssl command on the Pi, so no public CA has heard of it. The fingerprint you accept now is the one Sparrow will expect on every future connect; if it ever changes unexpectedly, something's off. That's the security value of first-use trust.
Troubleshooting a failed connect
- Guest WiFi strikes again. "Guest" or "isolated" WiFi networks on most home routers block client-to-client traffic, which is exactly what you need. Switch to the main WiFi.
- Stale certificate. If you used Sparrow before connecting to
a different Electrum server at the same hostname, delete the
cached certs and try again:
- Windows:
C:\Users\<you>\AppData\Roaming\Sparrow\certs - macOS:
~/.sparrow/certs - Linux:
~/.sparrow/certs
- Windows:
- Hostname resolution. If
raspibolt.localdoesn't resolve, use the Pi's IP address. Some Windows setups never enable mDNS by default.
Core workflow
Once you're connected, Sparrow is your window into the on-chain world. A quick tour:
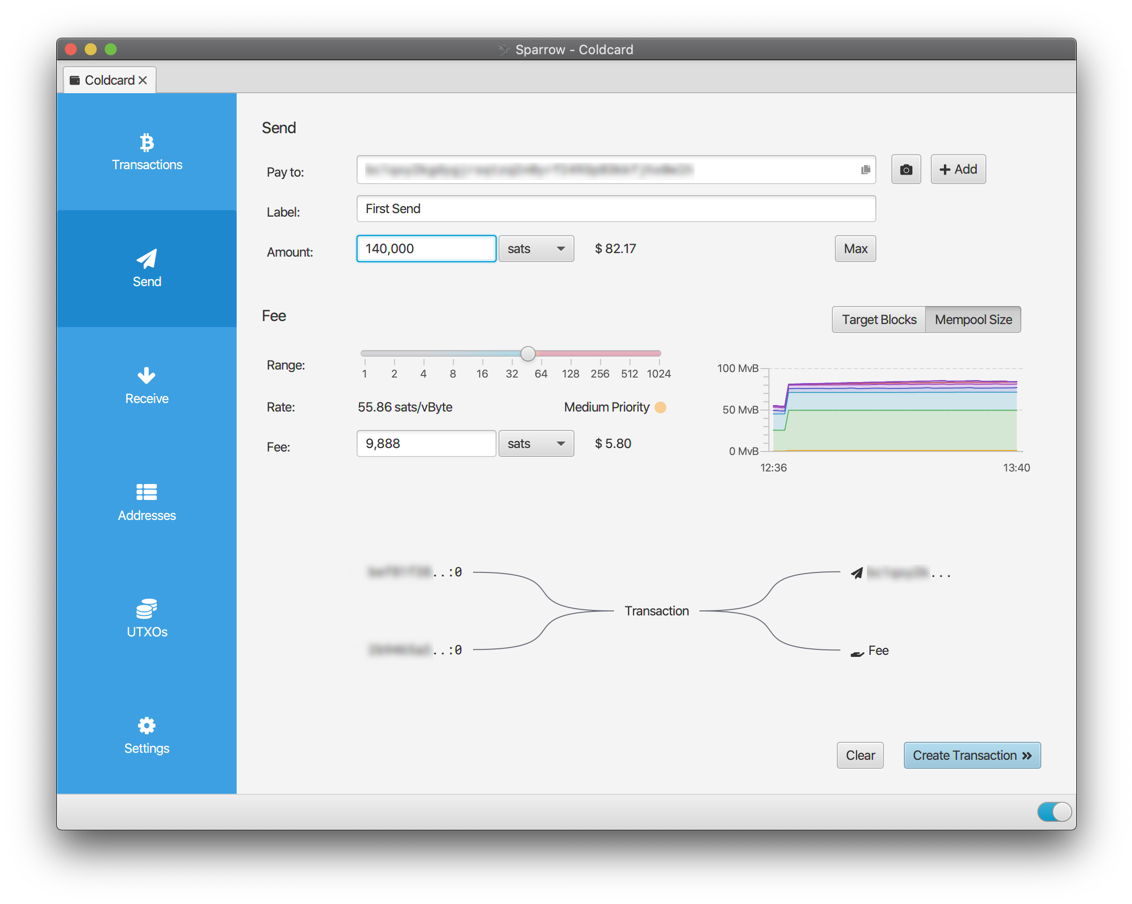
- Create a wallet → New Wallet → choose a name. For real funds, pick Connect Hardware Wallet and let Sparrow import the public keys (xpubs) from your device. The wallet is now watch-only: it can see, but not spend.
- Receive: go to the Receive tab, give the next address a label, and share it. Label everything you can. Future-you will thank present-you every time you look at a transaction history.
- Send: pick the UTXOs you want to spend from the UTXOs tab (this is coin control, an underrated privacy tool), draft the transaction, and let your hardware wallet sign it. Sparrow shows the exact bytes the device will sign, every fee, and every change output. Nothing is hidden.
- PSBT: if the signing device lives air-gapped (a Coldcard with an SD card, for example), export a Partially Signed Bitcoin Transaction, sign on the cold device, and import the signed PSBT back. Same result; no USB.
Label your UTXOs
This deserves its own beat. An unlabeled UTXO set is a chain-analysis paradise waiting to happen, you'll absent-mindedly combine a KYC exchange UTXO with one from a peer-to-peer trade and quietly doxx yourself. Labels in Sparrow persist across wallet opens, get exported with the wallet file, and show up in every coin-selection dialog. Use them.
Main takeaway: with Sparrow talking to your node and a hardware wallet plugged in, you have a setup that sits cleanly at the top of the self-custody tree, private, verified, spendable, and yours.
(Optional) Connect over Tor
Travelling? Point Sparrow at the Tor hidden service you set up in Electrum server so you can reach your node from anywhere.
- In Preferences → Server → Private Electrum, click Edit Existing Connection.
- URL: your
.onionaddress. Port:50002. SSL: on. - Test. Sparrow's bundled Tor client handles the routing, you
don't need to run Tor on the laptop separately, as long as the
URL ends in
.onion.
(Optional) Tor proxy for external services
Sparrow occasionally reaches outside your wallet: exchange rate feeds, CoinJoin coordinators, block broadcasts through public APIs. By default those go over clearnet and leak your laptop's public IP to whoever runs the other end.
If you're connecting to your node over a .onion already, Sparrow's
built-in Tor proxy covers all of that automatically. Done.
If you're connecting over the LAN (raspibolt.local or IP), tell
Sparrow to route external traffic through Tor running on your laptop:
- Install and start Tor on the computer:
- macOS:
brew install tor && brew services start tor(SOCKS on port 9050), or run Tor Browser (SOCKS on port 9150). - Linux:
sudo apt install tor && sudo systemctl enable --now tor(port 9050). - Windows: install the Tor Browser or the Tor Expert Bundle; see Privacy for the specifics.
- macOS:
- In Preferences → Server, toggle Use Proxy on.
- Proxy URL:
127.0.0.1. Port:9050(daemon) or9150(Tor Browser). - Test. The secondary icon at bottom-right now reads "External Tor proxy enabled".
Updating Sparrow
Sparrow checks for updates on launch and tells you when a new version is out. Download from the releases page, verify the signature the same way you did at install, and replace the installed version. The wallet files live in your user profile and survive any reinstall.