Web app
Ride The Lightning (RTL), the browser dashboard for LND. Node.js install, RTL-Config.json, Caddy reverse proxy on port 443 with self-signed internal TLS.
What does a Lightning node look like once you step away from the command line? For this guide, it looks like Ride The Lightning (RTL), a well-maintained open-source web dashboard for LND that covers channels, on-chain, routing, and fees in one place. No phone-home telemetry, no account, no upstream service; RTL runs on your Pi and talks to LND over the loopback interface.
You'll install Node.js 22, clone RTL 0.15.6 as its own
unprivileged user, point it at LND's macaroon and TLS certificate,
and expose it behind Caddy at https://rtl.raspibolt.local on your
LAN.
Install Node.js 22
RTL is a Node.js application and needs a recent LTS runtime. The NodeSource repository gives you upstream Node without waiting for Debian backports.
-
As user
admin, refresh the package index:sudo apt updateInstall the helper packages needed to add a third-party repo over HTTPS:
sudo apt install -y ca-certificates curl gnupgCreate the keyring directory:
sudo mkdir -p /etc/apt/keyringsImport NodeSource's signing key into a dedicated keyring:
curl -fsSL https://deb.nodesource.com/gpgkey/nodesource-repo.gpg.key | sudo gpg --dearmor -o /etc/apt/keyrings/nodesource.gpgAdd the NodeSource apt source:
echo "deb [arch=arm64 signed-by=/etc/apt/keyrings/nodesource.gpg] https://deb.nodesource.com/node_22.x nodistro main" \ | sudo tee /etc/apt/sources.list.d/nodesource.list -
Refresh the package index again so apt sees the new source:
sudo apt updateInstall Node.js:
sudo apt install -y nodejsConfirm the runtime version:
node --versionConfirm the package manager version:
npm --versionExpected output is a
v22.xline fromnode, and a10.xor newer line fromnpm.
If you already installed Node for the Bitcoin Explorer
BTC RPC Explorer uses the same NodeSource setup. If Node 22 is already present, skip this whole section.
Create the rtl user
RTL should not run as the lnd user, it's a web app with an
exposed HTTP port, and a compromise there should not hand an
attacker LND's admin macaroon. A dedicated rtl user keeps the
blast radius small.
-
Create the user. RTL only needs to read the macaroon; the copy is what keeps
rtlout of/data/lnd.Create the service user:
sudo adduser --disabled-password --gecos "" rtlCreate a directory for the LND credentials:
sudo mkdir -p /home/rtl/lndCopy in a read-only copy of LND's admin macaroon:
sudo cp /data/lnd/data/chain/bitcoin/mainnet/admin.macaroon /home/rtl/lnd/admin.macaroonCopy in LND's TLS certificate:
sudo cp /data/lnd/tls.cert /home/rtl/lnd/tls.certHand the directory to the
rtluser:sudo chown -R rtl:rtl /home/rtl/lndLock the macaroon down:
sudo chmod 600 /home/rtl/lnd/admin.macaroon
The admin macaroon is the keys to the castle
Anyone with admin.macaroon and network reach to LND's gRPC port
can open channels, close channels, and send payments. It is not
the seed, but it can drain active channels. Keep the file locked
down and do not commit it to any repository.
Install RTL
-
Become the
rtluser:sudo su - rtlClone the repo:
git clone https://github.com/Ride-The-Lightning/RTL.gitMove into the source tree:
cd RTLCheck out the pinned release tag:
git checkout v0.15.6 -
Verify the tag signature. RTL tags are signed by Suheb.
Fetch the signing key:
curl https://keybase.io/suheb/pgp_keys.asc | gpg --importVerify the tag:
git verify-tag v0.15.6Look for
Good signature from "saubyk". The primary key fingerprint is3E9B D443 6C28 8039 CA82 7A92 00C9 E2BC 2E45 666F. -
Install production dependencies. This pulls a few hundred packages and can take ten minutes or more, the process occasionally appears frozen on a single package, it's fine:
npm install --omit=dev --legacy-peer-depsSuccess looks like
added NNN packages ... found 0 vulnerabilities.
Configure RTL
RTL ships a sample config; you copy it, edit a handful of fields, and you're done.
-
As user
rtl, still in/home/rtl/RTL, copy the sample config:cp Sample-RTL-Config.json RTL-Config.jsonOpen it for editing:
nano RTL-Config.json -
Change these four values.
multiPassis the password you'll use to log into the RTL UI, make it a new one, password[E], not reused from anywhere else:"multiPass": "PASSWORD_E", "macaroonPath": "/home/rtl/lnd", "swapMacaroonPath": "/home/rtl/lnd", "boltzMacaroonPath": "/home/rtl/lnd" -
Further down in the
nodes→settingsblock, point RTL at LND on loopback. Leave the URLs as-is if the sample already uses127.0.0.1; changelocalhostto127.0.0.1if you see it, Node 18+ resolveslocalhostvia IPv6 first, which LND doesn't listen on:"lnServerUrl": "https://127.0.0.1:8080", "swapServerUrl": "https://127.0.0.1:8081", "boltzServerUrl": "https://127.0.0.1:9003"Also set
fiatConversiontotrueif you want USD/EUR totals in the UI, and leaveAuthentication → logoutRedirectLinkalone. -
Save, exit, and leave the
rtluser session:exit
Multi-node support
RTL can manage multiple LND, Core Lightning, or Eclair nodes from
one UI. This guide sticks to a single LND node for simplicity,
when you're ready, the
RTL docs
walk through adding more in the same RTL-Config.json.
systemd unit
-
As
admin, create the unit file:sudo nano /etc/systemd/system/rtl.service -
Paste:
# RaspiBolt: systemd unit for Ride The Lightning # /etc/systemd/system/rtl.service [Unit] Description=Ride The Lightning Wants=lnd.service After=lnd.service [Service] WorkingDirectory=/home/rtl/RTL ExecStart=/usr/bin/node rtl User=rtl Restart=always RestartSec=30 # Hardening PrivateTmp=true ProtectSystem=full NoNewPrivileges=true [Install] WantedBy=multi-user.target -
Reload systemd so it sees the new unit:
sudo systemctl daemon-reloadEnable the service so it starts on boot:
sudo systemctl enable rtlStart it now:
sudo systemctl start rtlFollow the log:
sudo journalctl -f -u rtlThe log should end with
Server is up and running, please open the UI at http://localhost:3000. Exit the tail withCtrl-C.
Expose RTL through Caddy
RTL listens on 127.0.0.1:3000, plain HTTP, bound to loopback.
You'll front it with Caddy (already installed in the Bitcoin
section) so you can reach it over HTTPS from anywhere on your LAN.
Caddy's internal CA issues a self-signed cert on the fly, which
your browser will warn about exactly once when you trust the root.
-
Open Caddy's site config:
sudo nano /etc/caddy/Caddyfile -
Add a site block for RTL. The
tls internalline tells Caddy to mint a cert from its own CA rather than trying Let's Encrypt (which won't work for a.localhostname anyway):rtl.raspibolt.local { reverse_proxy localhost:3000 tls internal } -
Reload Caddy so it picks up the new site block:
sudo systemctl reload caddyOpen the firewall for HTTPS on the LAN:
sudo ufw allow from 192.168.0.0/16 to any port 443 proto tcp comment 'HTTPS LAN only'Replace
192.168.0.0/16with whatever your home LAN actually uses. If you want RTL reachable from anywhere on the LAN without LAN-scoping, drop thefromclause, but think twice. -
Point your desktop browser at
https://rtl.raspibolt.local. If your router resolves.localmDNS names, this works as-is; if not, either add a DNS entry on your router or hit the Pi's IP directly and trust the cert warning for that hostname.Log in with password
[E].
Why self-signed is fine at home
Let's Encrypt needs a public DNS name and an internet-reachable port 80 or a DNS-01 challenge. Your home node has neither, and publishing the RTL dashboard on the open internet is not something this guide recommends. Caddy's internal CA produces a perfectly good TLS cert; the browser warning is a one-time "I trust this host on my LAN" click. If you want a trusted cert for your LAN, use DNS-01 with a real domain you own, but that's a separate bonus guide.
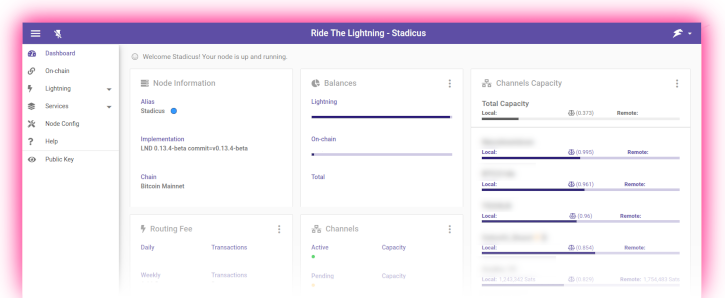
Walk around the UI
First-login tour:
- Home, headline numbers. On-chain balance, channel balance, payments, invoices, and node ranking at a glance.
- Lightning → Channels, open channels, pending channels, and the button to open a new one. Channel policy (base fee, fee rate, time lock) lives in the per-channel view.
- Lightning → Payments, pay an invoice by pasting it, or generate one to receive. The payments table shows every Lightning payment the node has sent.
- Routing, earnings from forwarded payments, plus a per-peer breakdown. This is where you'll see whether your channel policy is attracting any volume.
- On-chain, deposits, sends, UTXOs, and the sweep tool.
- Node Settings → Services → Watchtowers, the towers you
configured with
lncli wtclient addshow up here too.
Main takeaway: you now have a proper dashboard on your LAN.
Everything lncli does, RTL does with a mouse, plus graphs.
Upgrading RTL
-
As
admin, stop the service:sudo systemctl stop rtlSwitch to the
rtluser:sudo su - rtlMove into the install directory:
cd /home/rtl/RTL -
Fetch the latest tags:
git fetchDiscard any local changes:
git reset --hardResolve the newest version tag into a shell variable:
latest=$(git tag | grep -E "v[0-9]+\.[0-9]+\.[0-9]+$" | sort --version-sort | tail -n 1)Sanity-check the resolved version:
echo "$latest"Check out that tag:
git checkout "$latest"Verify the signature on the tag:
git verify-tag "$latest"Reinstall dependencies:
npm install --omit=dev --legacy-peer-depsDrop back to
admin:exit -
Update
0.15.6inlib/versions.tsto keep this guide honest, then restart the service:sudo systemctl start rtlFollow the log:
sudo journalctl -f -u rtl
Lightning client
Install and configure LND (Lightning Network Daemon). Write lnd.conf for bitcoind RPC and ZMQ, generate the 24-word seed, set up auto-unlock, enable watchtower and wumbo channels.
Mobile app
Pair the Zeus iOS/Android wallet with LND over a Tor hidden service (onion). Generate the lndconnect URL with qrencode, paste admin macaroon, connect.